참고글: https://zsoo.net/post/2022-05-16-proxmox-gpu-passthrough.html
공식링크 : https://pve.proxmox.com/wiki/PCI_Passthrough
https://blog.quindorian.org/2018/03/building-a-2u-amd-ryzen-server-proxmox-gpu-passthrough.html/
PVE 설정
# vi /etc/default/grub
GRUB_CMDLINE_LINUX_DEFAULT="quiet intel_iommu=on intel_iommu=pt pcie_acs_override=downstream,multifunction nofb video=efifb:off vga=off"

# amd
GRUB_CMDLINE_LINUX_DEFAULT="quiet amd_iommu=on amd_iommu=pt pcie_acs_override=downstream,multifunction nofb video=efifb:off vga=off"
# grub 적용
update-grub# vi /etc/modules # 추가
vfio
vfio_iommu_type1
vfio_pci
vfio_virqfd
# pve에서 gpu 인식 제외
echo "blacklist radeon" >> /etc/modprobe.d/blacklist.conf
echo "blacklist nouveau" >> /etc/modprobe.d/blacklist.conf
echo "blacklist nvidia" >> /etc/modprobe.d/blacklist.conf
# vfio 정보 조회 및 등록
lspci -v 와 `tag: value' 의 정의.
Verbose format (-vmm)
The verbose output is a sequence of records separated by blank lines.
Each record describes a single device by a sequence of lines, each line
containing a single `tag: value' pair. The tag and the value are sepa‐
rated by a single tab character. Neither the records nor the lines
within a record are in any particular order. Tags are case-sensitive.
lspci -v |grep -A3 nvidia # `tag: value' 형태 찾기.
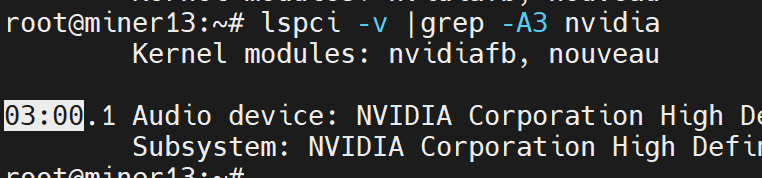
lspci -n -s 03:00 # 전 단계의 `tag: value' 형태

# ids 부분을 위 명령어의 출력 값으로 변경
echo "options vfio-pci ids=10de:0a65,10de:0be3 disable_vga=1"> /etc/modprobe.d/vfio.conf
# 적용 및 재부팅
update-initramfs -u
reboot
가상 머신 - 윈도우(테스트 용)
하드웨어 PCI 추가
윈도우10(테스트 용도) 설치된 가상머신을 종료 후 하드웨어 추가

하드웨어 설정

그래픽카드 드라이브 인식


cuda, cudnn 설치

GPU 사용 테스트
pytorch 설치

가상 머신 - 리눅스(우분투)
OS: ubuntu 22.04 (root 권한)
Driver 설치
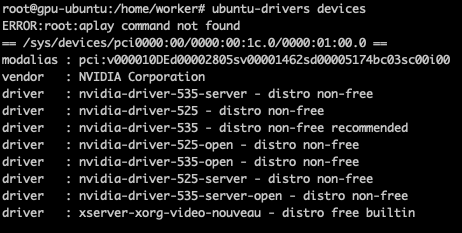
드라이버 설치 옵션 확인 및 설치
(cuda 설치와 같이 진행 할 수 있지만 실패..)
ubuntu-drivers devices
ubuntu-drivers autoinstall # (혹은 apt install nvidia-driver-535 등 원하는 패키지 선택)
nvidia-smi # 드라이버 확인

cuda toolkit설치
# 드라이버 설치 할 때 cuda 12.2 버전이 설치 되었다. cuda-toolkit을 설치 해야한다.
https://docs.nvidia.com/cuda/cuda-installation-guide-linux/index.html
다운로드: https://developer.nvidia.com/cuda-toolkit-archive
./cuda_12.1.1_530.30.02_linux.run

PATH 설정
/etc/profile 혹은 ~/.bashrc 하단에
PATH=/usr/local/cuda-12.1/bin:$PATH # 추가
cuda 확인
nvcc -V

cudnn 설치
https://docs.nvidia.com/deeplearning/cudnn/install-guide/index.html
tar Jxf cudnn-linux-x86_64-8.9.6.50_cuda12-archive.tar.xz
cp cudnn-*-archive/include/cudnn*.h /usr/local/cuda/include
cp -P cudnn-*-archive/lib/libcudnn* /usr/local/cuda/lib64
chmod a+r /usr/local/cuda/include/cudnn*.h /usr/local/cuda/lib64/libcudnn*
cuda 확인
pytorch 설치 : pip3 install torch torchvision torchaudio
cuda 확인

다음 목표: k8s 노드에 gpu 사용
'Infra' 카테고리의 다른 글
| [Proxmox] ZFS RAID 복구 시나리오 (0) | 2025.11.29 |
|---|---|
| [Streamlit] Nginx proxy_pass (0) | 2023.12.22 |
| [SSL] certbot ssl 발급 : nginx forward proxy 설정까지 (0) | 2023.11.29 |
| [k8s] 모니터링 : Prometheus & Grafana (nginx ingress 설정까지) (1) | 2023.11.26 |
| [k8s] Nginx ingress : Bare metal clusters 설치 (1) | 2023.11.24 |